

")
Who doesn’t like Banoffee Pie? But what to do when you adhere to a vegan diet? Don’t worry! We are going to present a Vegan Banoffee Pie recipe for you!
In this dessert, different shades of taste are extremely organically combined- from Bananas, crushed biscuits, Dates, sliced bananas, freshly whipped cream, plant-based milk, and chocolate.
The best thing about this vegan pie is that it is free from refined sugar, gluten and it doesn’t require baking. This version is not only delicious but also incredibly healthy! Try it for everyone! Even if you have guests on your doorstep, then this recipe is especially for you.
Why should you try this recipe?
You must try this recipe because it is one of the best vegan treats you will ever make! In addition, it is loaded with lots of textures and flavors and:
- easy to make
- impressive to friends and family!
- uses common pantry ingredients
- delicious
- dairy-free, egg-free, and you can also make it gluten-free
So put your aprons on and try this vegan Banoffee Recipe!
Vegan Banoffee Recipe
Nutritional Value
436 calories,
38.4mg cholesterol,
182.5mg Potassium,
29g added sugar,
5.7g crust protein
Ingredients:
1/4 cup melted vegan butter
1 1/2 cup (170 g) vegan graham cracker crumbs
1/2 tsp cinnamon
2 tbsp sugar (for crust)
1 1/2 cups (217 g) Medjool dates
1 tsp vanilla extract
1 cup water
1 overripened banana (must be sliced)
1 can (13.5 fl. oz/400 mL) full-fat coconut milk(must be refrigerated overnight)
1/4 cup icing sugar (for topping)
1 tbsp vegan chocolate shavings
Instructions
Preheat oven to 375ºF.
Take a bowl and mix graham cracker crumbs, melted butter, cinnamon, and sugar in it. Combine until thoroughly mixed.
Now take a pie pan and lightly grease it. Press the crust into it and bake for 10 minutes.
Press into a lightly greased pie pan and bake for 10 minutes. Let it cool on a wire rack and prepare the filling.
Chop the dates. You can make a smooth paste in a blender or leave some small chunks of dates.
Add dates, 1 cup water, and vanilla extract in a small pot and cook for 10 minutes or until thickened and bubbling.
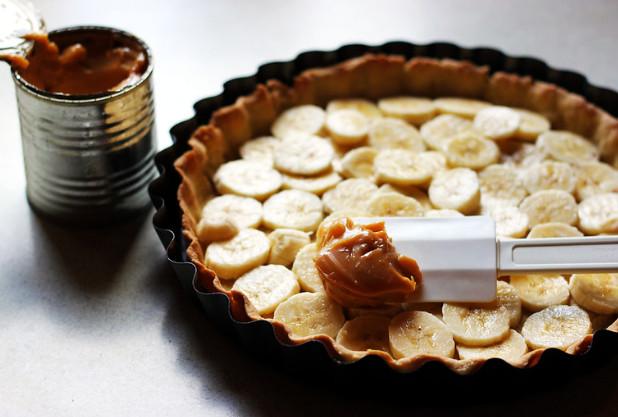
Add filling to the crust and refrigerate for 1-2 hours.
When your pie is chilled, add a layer of slices of banana.
Add the coconut cream and ¼ cup icing sugar to a large bowl and whisk until soft peaks form.
Add the cream on top of the sliced bananas.
Decoration Ideas
- Sprinkle with shaved chocolate and serve!
- If you are looking for more garnish ideas, sprinkle over some nuts such as peanuts, hazelnuts, slices of banana, or more toffee bits.
Some Useful Tips
When you bake the crust, it will become puffy. If you like a firmer graham crust, press it down with the help of the bottom of a glass.
Let the crust cool completely before filling.
Place the Banoffee pie in the fridge to set or until ready to serve for at least 1 hour.
I always recommend a sharp knife that is run under hot water to achieve nice clean slices.
Never use ripe bananas because they will brown within 24 hours. Only use those bananas that are ‘just’ ripe.
You can also use sweetened condensed milk to make your pie more delicious but remember, boil that condensed milk over low heat until it becomes thick and caramel-colored. You can buy any type of coconut condensed milk too.
FAQ
Can I make Vegan Banoffee ahead?
It is better to make the crust the day before preparing the dessert itself; then, it will be infused and will have a richer taste. If you have premade crust, the preparation process will take no more than 15 minutes, excluding the time for cooling the dessert itself.
You can also store the whipped coconut cream in a container. Slice the bananas and assemble the whole pie just before serving!
It will be very difficult to hold on, but if the finished Banoffee is chilled in the refrigerator for about 4-5 hours, it will hold its shape better when cut.
How do you keep bananas safe from darkening?
Make sure that your whipped cream covers every inch of the banana. But if you can also slice the bananas and sprinkle lemon juice on top of them to help prevent browning.
Can I use biscuits to make a crust?
There are so many recipes for Banoffee pie in which digestive biscuits are used. If you want to add biscuits to your Banoffee pie base, you must ensure they are crushed to a fine crumb. Remember, anything you use for your base, make sure they are all well-combined, stick, and vegan friendly.
What does Vegan Banoffee pie taste like?
The taste of Vegan Banoffee pie is beyond delicious, and it is a perfect combination of the unhealthiest ingredients. You can’t judge that it is made without dairy products. It’s a great treat for the mind and the taste buds.
How long does homemade Banoffee pie last?
It is recommended to eat the vegan banoffee pie within 24 hours after it’s made. Well-covered pie can last 3 to 4 days in the refrigerator. But remember that the bananas will turn darker with each passing day. In addition, you can’t freeze this pie because of the delicateness of the cream and the fruit. It will become soggy once defrosted.
Let’s Sum Up
Banoffee pie is by far the most delicious dessert famous all over the world. This vegan version can be offered to both children and those who care about their health because it is prepared with vegan-friendly ingredients. Also, it’s a healthy dessert for those children who don’t want to eat nuts and bananas. You can eat this dessert for breakfast. Moreover, the most important benefit of this dessert is it is free from gluten and refined sugar. So, try this recipe and enjoy it on your comfortable couch.
If you tried Vegan Banoffee Pie, share your experience in the comment box. We would love to hear from you. Also, don’t forget to follow us on our social media platforms.
[pinterest-image message=”Vegan Banoffee Pie Recipe #vegancake #veganpie #vegandessert” image=”https://veganiac.com/wp-content/uploads/2021/09/Vegan-Banoffee-Pie-Recipe-pin.jpg”]


